Car PC: Part 4 – The Installation
With the hardware set up and all the software systems configured, it was now time to install the whole thing into the car itself. The whole process took a while to do and was split into three main chunks:
Wiring
The first job was to lay down all the wiring. This included power cable, speaker wire and extension leads for the screen.

In the above diagram, what is not shown, is that both the PC and Amp take their power from a thick power lead, fused, put through a distribution block, and run directly from the battery. Additionally, a switched positive connection is required for the M2-ATX to initiate remote startup and shutdown procedures. The easiest place to run this from, I found, was the existing headunit ISO loom.
The black, red and green connectors running to the screen in the diagram are the power supply and USB/VGA connectors. The power was spliced into a connection from the M2-ATX as the screen is designed to run from regulated 12V DC. These cables were run down the centre of the car.
Finally, as shown on the diagram, the audio connections run from the PC to the AMP via a 3.5mm audio jack adapter –> RCA/Phono connectors (blue), and then from the amp, I wired the speaker outputs to the old headunit ISO loom (purple wire pairs). All the speaker cable in the car was replaced with decent quality, shielded stuff. The picture below shows the cables being laid with the centre of the car bare as a work in progress.

Another note: When running the cables down the car, it is important to physically separate the power and data/speaker lines to prevent interference which commonly manifests itself as alternator whine coming through the speakers. The easiest way to do this is to run the two sets of cables down either side of the centre console, or run them down either side of the car itself.

The above pic shows the cables running from the car interior, through the ski hatch and into the boot.
The Screen
With all the wiring in place, access to the wiring loom behind the dash was no longer required and so the screen was the next thing to fit. Obviously, prior to the final installation it had been tested for fitment so it was simply a case of refitting the centre console with the screen installed into the dash. The pic below shows what things look like behind the scenes on the dash:

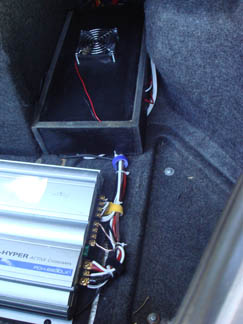
The PC
And finally the PC was secured in the boot using metal mounting brackets beside the subwoofer and the wiring tidied up. All the USB data leads, VGA connection and the power and switched ignition leads were connected to the PC and Amplifier via the M2-ATX. Just to note that at this point, the amplifier being used is quite a basic one which is why it has not been installed ‘cleanly’. When I get a proper amp, the boot installation will look a lot tidier and I will gain a bit more boot-space.

You can see the PC beside the subwoofer and it fits snugly in the gap.
The ultimate plan is to create a ‘stealth’ panel in front of where the PC is currently fixed and fit the amplifier behind that as well. That should make things look a lot cleaner and give some more room (not that I use the boot a lot anyway).
The Finished Article
With everything done, here are a few pics of how it looks completed and installed:

Loading/resuming Windows XP at boot up:

The main front end view (this is Centrafuse, but I usually use RoadRunner)

Sat Nav view

Media player currently playing Linkin Park

GPS and WiFi adapters installed out of the boot for better reception. They are hidden behind the seatbelt and secured to the plastic coving.

View from the rear seats.

Overall, the installation looks very OEM (to me at least! and boot excluded obviously lol). There is no evidence of the masses of cabling in the car and having the PC gives me a lot of functionality that I wouldn’t get with a regular headunit or even an all in one headunit costing a lot more.
There is also a lot of room for potential upgrades and further features which I can implement at a later date – and I have hinted at a few plans throughout the course of these posts… so this is basically a never ending project!
I hope it has been a good read and things do make sense. If you have any comments or questions, either post away on any of the posts (parts 1- 4) or just get over to the forums for anything a bit more in-depth.
Cheers.


hi i realy have one car pc ,and with raod runner program but its not work at alla nd i cant use it ,and i cant setting it can i have your help and support ,,may be its not origenal ..this car pc is manufactured in china ,,hope to tell me what can ido ??? i can your soft ware program if it available ,best regards ….. dr nasser